
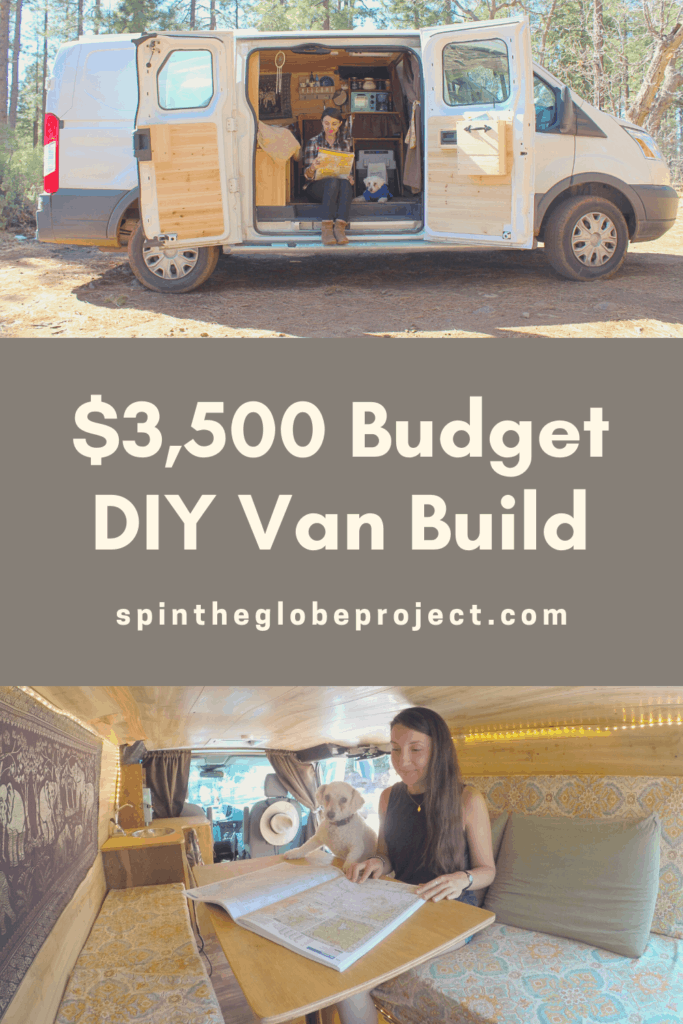
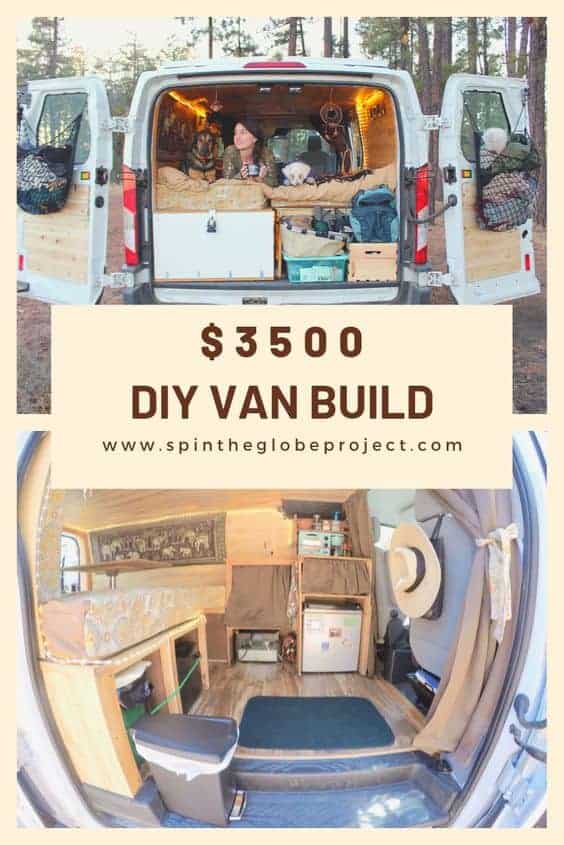
In May of 2017, I bought a used Ford Transit and began converting it into an off-grid mobile home named Casper. The van build took about 2 months while working on it part-time and cost about $3,480.
About the Van
Casper is a 2016 Ford Transit 250, standard length (130″ wheelbase), low top Cargo Van, which I bought slightly used for $24,000 with a little over 18,000 miles on it. The van was formerly a U-Haul and I bought it from a certified pre-owned Truck & Van dealership in Mesa, AZ. Casper gets on average 18.5 mpg and takes both ethanol and regular gasoline.
Choosing the right van for my needs
I researched and test drove a Mercedes Sprinter, Chevrolet Express, Dodge Ram ProMaster, and a few other passenger and cargo vans. Many of the other vans I looked at were much cheaper (except the Mercedes, Sprinters– which were much more expensive), but they all had low fuel-efficiency, already had a lot of miles on them, and were no longer under warranty.
As a solo female traveler planning to camp off-grid in rural settings, safety was a high priority for me. Meaning, I didn’t want something that will be breaking down in the middle of nowhere, and if it did, I wanted to be able to easily get parts and service.
Want info about camping off-grid? You might like my guide to finding free campsites.
I’m also concerned about my carbon footprint, so I wanted something with decent gas mileage and flexible fuel options.
In the end, I chose my van because it is flex-fuel, stealthy since it is a white fleet van, aerodynamic, newer ford vans drive SO smoothly (like a regular car), they’re American made and easy to get serviced anywhere, and mine was still under warranty.
I love my van, but if I could do it again, I would have bought a Ford Transit high-top (probably with an extended body), so I could stand up inside and have more room for cabinetry and storage.
Quick Note: After 4+ years of van life, these are the 27 van life items I think are essential.
The DIY Conversion Process
The conversion was a somewhat sporadic endeavor, spanning 2-months while working on and off with the help of friends and family. I didn’t keep thorough track of how many hours I spent working on the van build, but I’d guess about 100 hours of labor went into it.
I included a supply sheet of all the building materials and expenses at the bottom of this post. I also made a conversion kit, which includes products I have used in both my budget and “luxury” conversions that I highly recommend in your own van build. I purchased almost everything for the van on Amazon or at Home Depot.
I used quite a few resources to get started, mostly Youtube van conversion tutorials, Pinterest for design and layout ideas, and The Vanual.
DISCLAIMER: Even with all the preparation, the build consisted of a lot of trial and error- considering I had ZERO prior woodworking experience. This is an amateur van build, so feel free to take my suggestions and lessons with a grain of salt. In most cases, I chose the easiest, quickest, cheapest options (with the exception of the expensive solar electric system) because I was anxious to get on the road. I don’t claim that this is the best way to convert a van, but everything I built worked well for 3 months of full-time van life and about a year of part-time van adventures.
So without further ado, here’s how the van conversion went down…


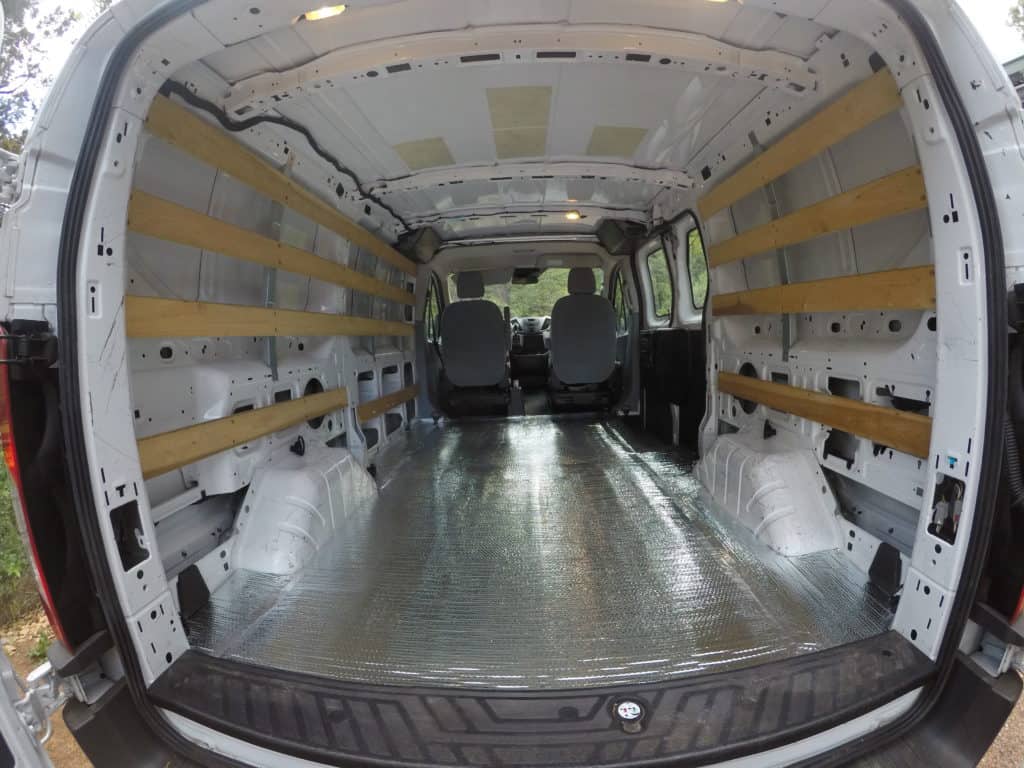
Casper, came quite bare, with these wood beams on the side, which I decided to leave on. It also came with a metal partitioner in the front, behind the driver and passenger seats, which I had taken out at the car dealership I bought the van from.
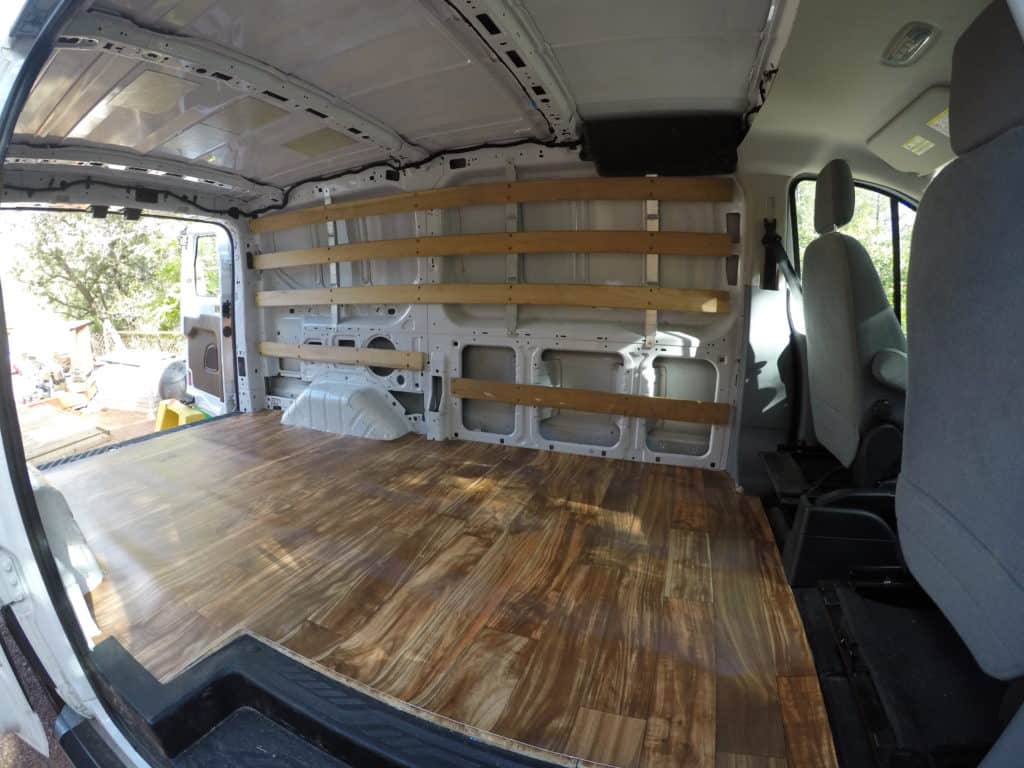
Step 1. Making the Floor & Insulating the Van
I started by insulating the floor.
I did this by cutting and taping together pieces of reflectix (with reflectix foil tape), until the floor of the van was covered. After I had the floor insulation mapped out, I used my reflectix blueprint to trace the shape of the floor around the wheelbases onto plywood, which I then pieced together like puzzle pieces to create a floorboard.
Then I gathered my mom’s tools and borrowed two saw horses from my neighbor, and we got to work.

We measured (twice), chopped, and screwed the floorboards directly into the van, over the reflectix insulation.

We used two pieces of 8′ x 4′ plywood to create 4 separate puzzle pieces around the wheelbase and side stairs.

Then we glued in some “wood” sheet vinyl for the finishing touch. We used Sheet Vinyl Adhesive, which is durable but dries quickly. So we did it in sections and placed bricks on top of the vinyl to help secure the vinyl to the plywood and assist the glue to set in.


After the floor was done, we insulated the walls with a layer of reflectix, and then on top of that, we added pure safety insulation rated at R15 (the white wool looking strips). Luckily the wood beams were already in place along the walls and made this process much simpler by holding the insulation in place.

Step 2: Building the Bedframe and Storage Spaces
We built a bed frame and storage units with scrap wood and with leftover plywood from the floor. We deliberately designed the layout of the van around a chuck box that my mom built with her dad. We incorporated the chuck box so that it would act as part of the support system for the bed and could be used as extra storage and a countertop for cooking on a portable stove when the chuck box is open.
I wanted to be able to access my storage spaces from multiple areas. So I left openings in the front and back of my bed frame, and a small side hole. For the driver side storage unit, we created two separate hinge doors, for top loading storage access.
I also created the layout so that I could have a small bed with a table and couch, or I could convert it to a larger bed when I’m not using the table.

The chuck box is not a permanent fixture in the van (which was a part of the design), so after we created the bedframe and side storage unit, we took the chuck box out to make it easier to move around during construction.
I screwed in some plywood to make the top of the bedframe (on the right), and created hinge lids out of plywood for the storage spaces (on the left).
We also built, a cubby hole for my bathroom. That green bucket with the white lid is my toilet (in the picture below).

Step 3: Installing the Walls

I used faux wood wall paneling for the walls, which was simple enough to screw directly into the horizontal wood beams on the side of the van. I used this because it was cheap, quick and easy to install, but still looked good. It worked fine, but if you have the budget, I’d recommend using real wood instead.
Step 4: Building the Kitchen
My neighbor let us use his workshop and helped give us guidance on how to tackle the kitchen. At this point, I had already bought a refrigerator, so we built the kitchen countertop and shelves around those dimensions. Utilizing his drafting knowledge and his table saw really helped speed up the process.


I went through a few stainless steel bowls, attempting to drill holes in them to make my own sink, before giving up and buying a $20 Sterling Oval Single Basin Self-Rimming Undermount Sink from Amazon’s Warehouse (this sink was a bit small for

Once I had the sink I was able to saw out the hole in my kitchen countertop.
I then used the extra wood to build a table. I screwed in a table base that I bought on Amazon to the table, and another on the floor of my van.

I also created a plank that would complete my bed when I wasn’t using the table.


After I had all my pieces sawed out to the appropriate measurements to fit in the van, I sanded them, stained them, and left them out to dry.

Then I used silicone to seal my sink into the counter and drilled in my new hand pump faucet.
I installed my kitchen, with my side loading AC/DC fridge, my new 3-in-1 breakfast center, and my new table.
Step 5: Plumbing
I used two 5 gallon water containers for my plumbing system (one for input and one for output/gray water). I ended up storing my water output jug under the bench seat, and kept the input water jug directly under the sink.
I used braided vinyl tubing to connect my faucet and drain to the water containers and metal clamps, flex coupling and PVC bushing to secure them in place.

Step 6: Making the Bed
I bought a queen size 6-inch memory foam mattress for my van bed. Which I highly recommend because it’s given me some of the best sleep of my life.
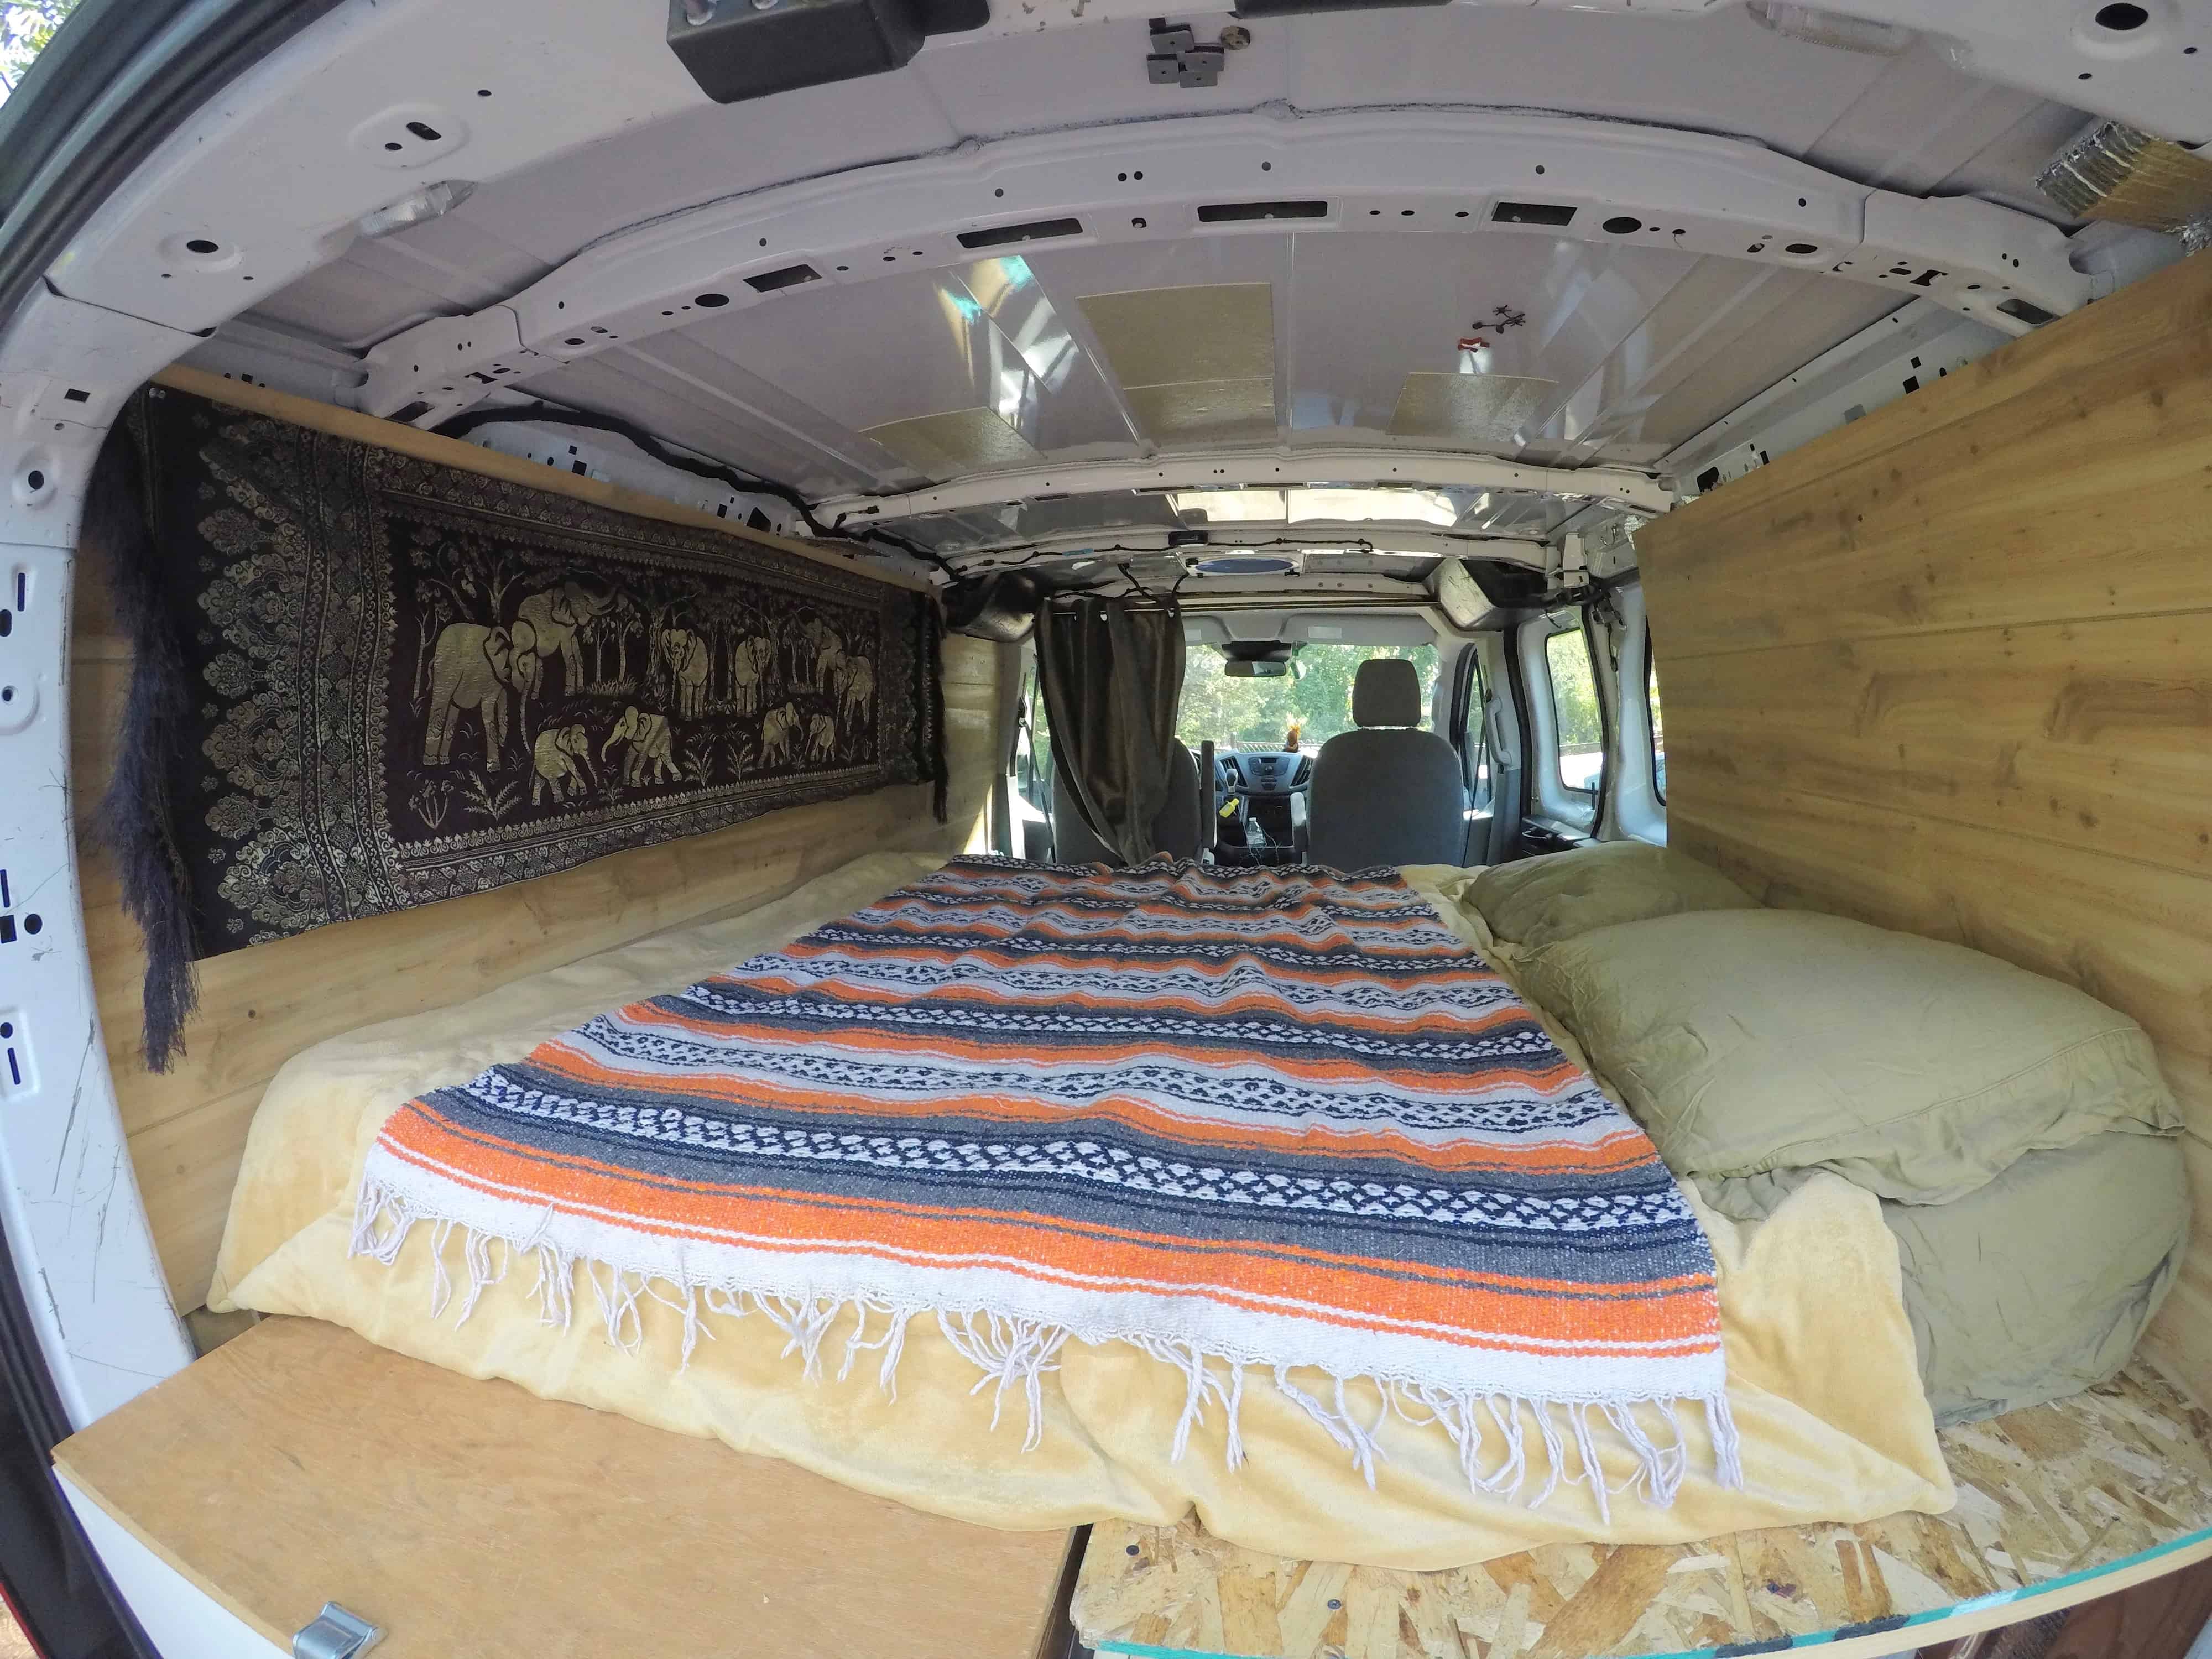

I traced out the pieces with chalk, directly on the mattress, and then cut the mattress with a bread knife into 5 separate pieces that make a couch and a bed, or they can combine to make one large bed.


I picked out the fabric at Walmart and my aunt upholstered all my cushions for me.
Step 7: Installing the Roof

We saved the roof for last, because we had no idea how to tackle it.
We spray glued the insulation (reflectix and pure safety) to each other and then glued and taped it to the roof with reflectix foil tape.
Then we screwed in the same faux wood paneling we used for the walls. We ended up trimming the paneling around the fantastic fan with a jigsaw, and later cut out a hole for the FantasticFan air vent. This roof ended up sagging, so I don’t recommend using this kind of paneling for a roof, unless you install multiple points to secure it too.

Step 8: Fantastic Fan and Solar Panel Installation

I hired people to install my vent and solar panels, because neither my mom or I felt comfortable cutting or drilling holes into the roof of the van ourselves.

I bought a FantasticFan on Amazon and took it to RV Renovators in Mesa, AZ to install. They did a fantastic job 🙂
Note: I do not recommend this fan, and I ended up upgrading to the Maxxair vent/fan, which I highly recommend.

I bought two 160 Watt 12 Volt solar panels, and my mom’s friend installed them on the roof of the van.
We then connected them to a Goal Zero Yeti 1400 Lithium power station inside the van. This power station is a lithium battery, inverter, charge control, display screen, and power outlets all in one and I highly recommend it!
Step 9: Curtains and Black Out Shades
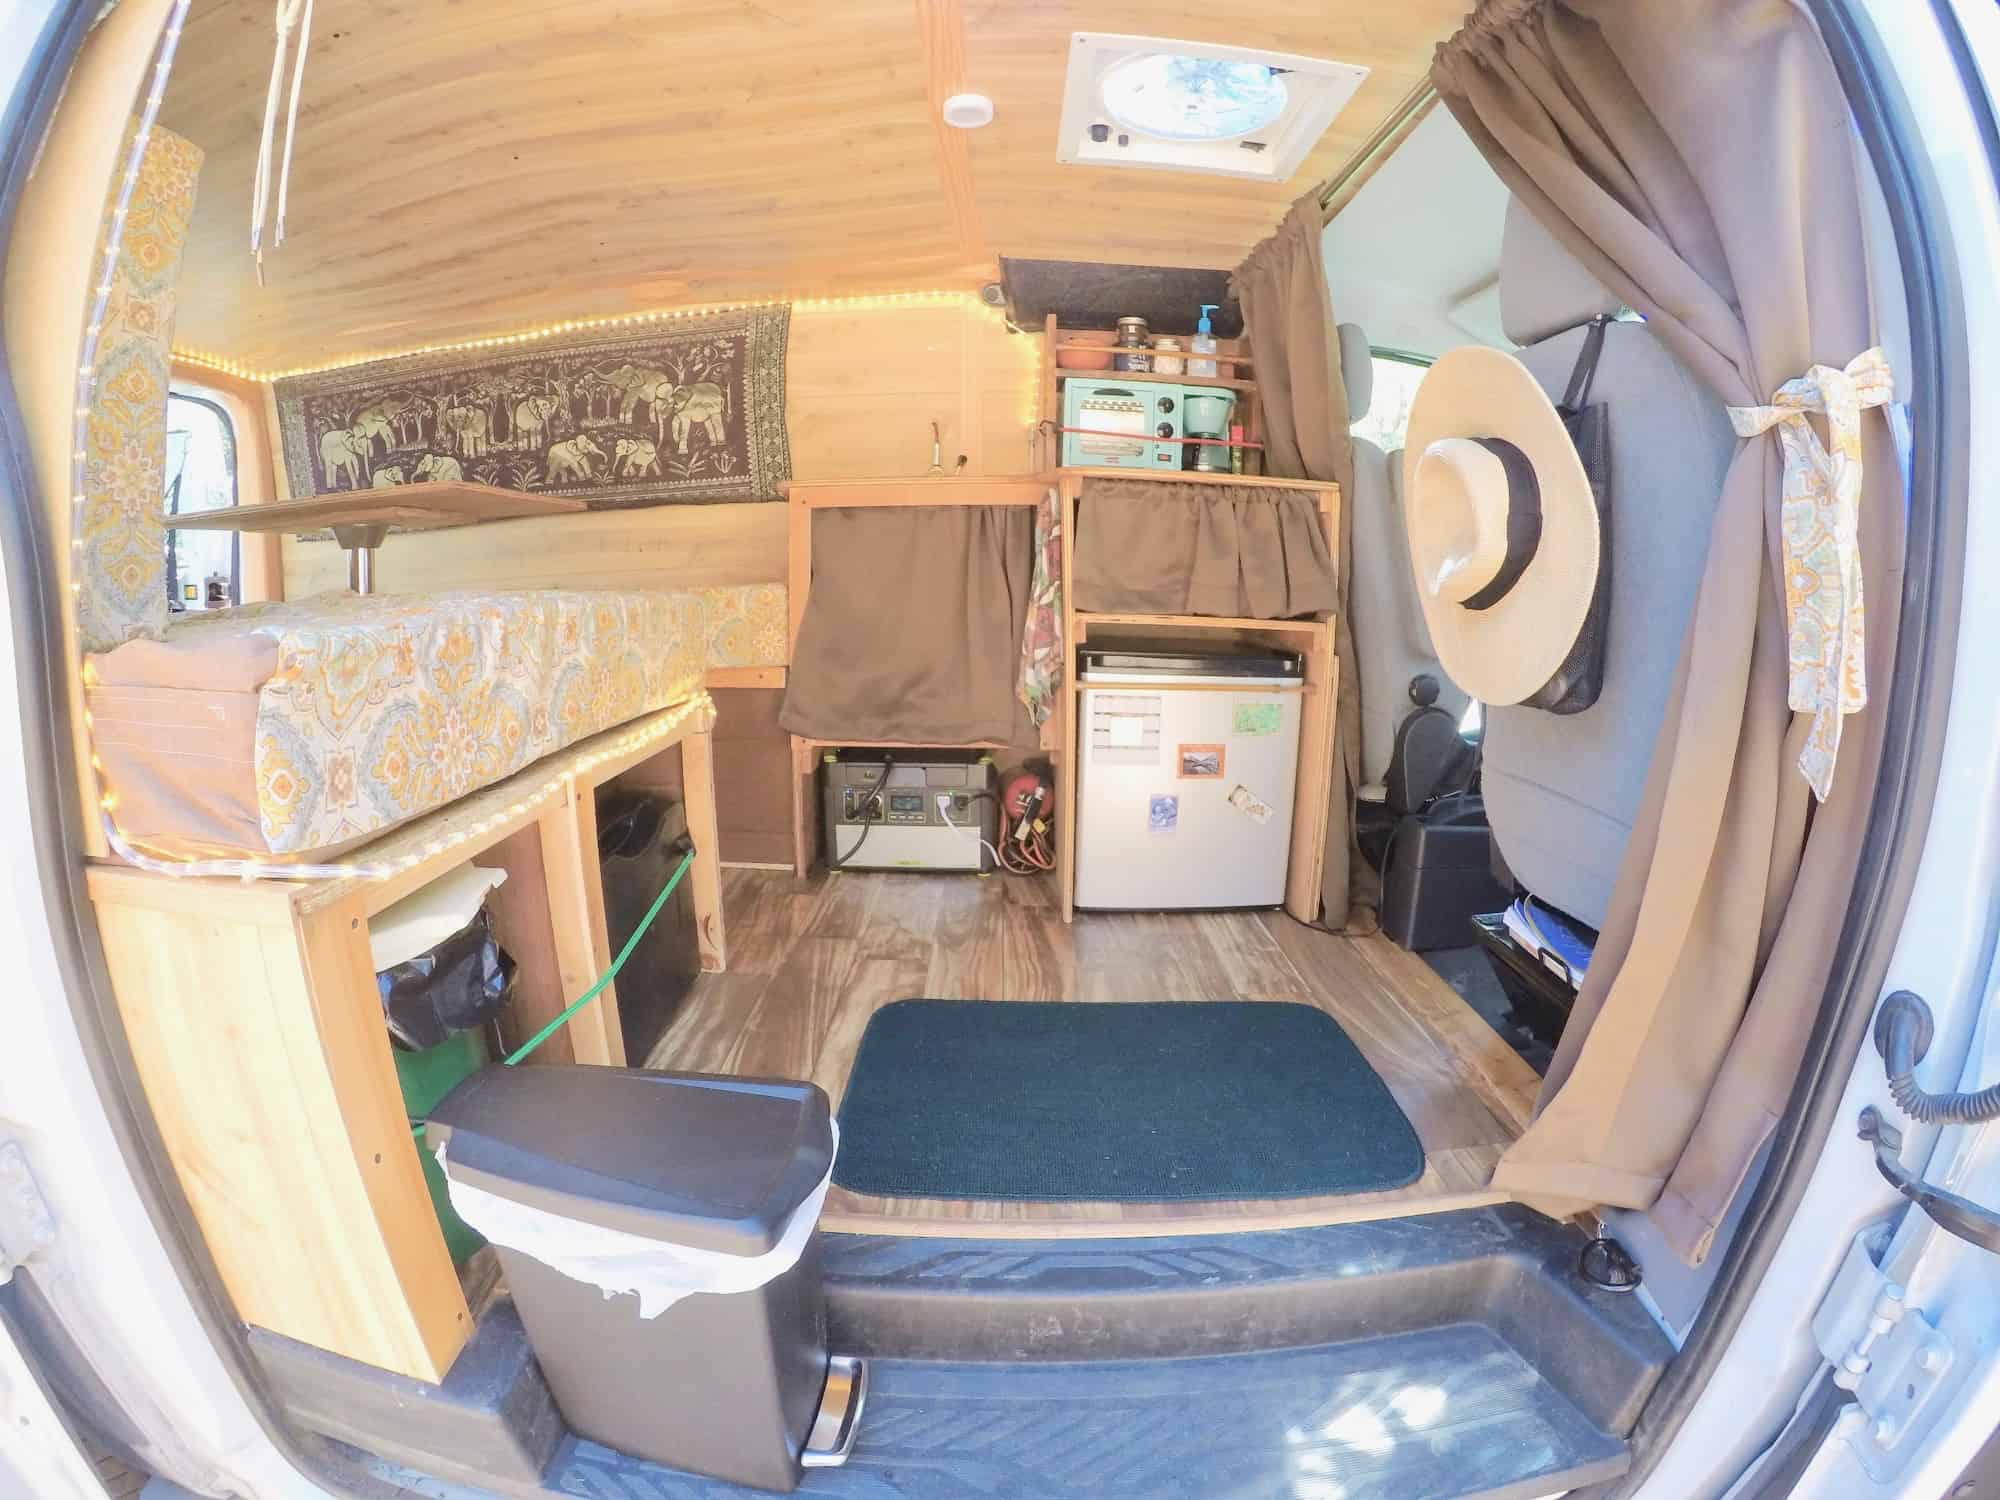
For the final touches, my aunt hemmed some black out curtains for behind the driver and passenger seats and used the excess fabric to sew curtains for my kitchen cabinets area.
I hung all my curtains with tension rods, which I also used on my shelves to secure things while I’m driving.
Finally, I used excess Reflectix insulation to cut out window shades. I then spray painted them black so they don’t stand out as much from the outside of the van.


In the end, I spent $3,480 on my camper van build.
$1800 of that, was for the Goal Zero Power Station. So $1,680 was for materials, appliances and construction. The conversion could have been much cheaper, had I gone a different route on my solar electric system. But I didn’t have the skills to wire together an inverter, a battery, plug outlets and a display system, so I thought the amateur user-friendly and space saving option was the way to go.
All in all, I love the way Casper turned out. It’s not perfect, but I am proud of how cozy and functional my little mobile home ended up being.
A big shout out to everyone who helped me convert this van-especially
March 2019 Update: I did a major renovation on my van. I had a high-roof-extension installed and had the entire van professionally remodeled by RV Renovators located in Mesa, Arizona. I upgraded many features of the van after determining what I liked and disliked about my first budget DIY build.
Take a tour of my remodeled van…
A few parting suggestions for your own van build:
- Buy a van you can stand up in! Especially, if you plan on using your van as your full-time home and “office.”
- Invest in a top-loading DC compressor refrigerator, because they are very energy efficient and can double as an ice-chest if you run out of power
- Get warm LED tube/strip lights for at least one of your lighting options- they are very energy efficient and create a great ambiance!
- Get a swivel base for your passenger seat (this gives you a lot more seating options and living space)
- Design your layout with a sink and extendable faucet near a door so it can double as an outdoor shower
- Put in power outlets on both sides of your van (I only installed one set in my remodel, and it’s inconvenient to only have one place to plug in electronics)
Feel free to check out my cost & supply sheet below, and browse through the products I used that worked out well for me in my van builds.
Van Build Supply & Cost Sheet
Insulation:
- Reflectix Insulation – $93
- Reflectix Foil Tape Roll (2@$8)- $16
- Owens Corning: Pure Safety Insulation R15 HP AA 15″X93″ (2@37.99) – $75.98
Flooring, Walls, Ceiling, Bedframe, and Storage Units:
- 2 x Sheathing Plywood 19/32 in x 4 X 8ft – $40
- Canyon Yew 32 sq. ft. Wall Paneling 5/32″X4’X8′ (Home Depot) – $75.88
- Luxury Vinyl Sheet for Flooring (Redwood Acacia 12’ x 6’) – $61.44
- Miscellaneous screws, hinges, and metal brackets- $25 (approximately)
- Sheet Vinyl Adhesive– $5.99
Plumbing System:
- Sterling Oval Single Basin Self-Rimming Undermount Sink (Amazon Warehouse)- $21.56
- Valterra RP800 Chrome Rocket Hand Pump Faucet- $26.49
- GE Silicone II W&D Clear 2.8 oz.– $3.98
- 2 x 5-gallon plastic water containers– $10.65
- 10′ Braided Vinyl Tubing (5/8 O.D X 3/8 I.D. X 10′) – $10.78
- 10′ Braided Vinyl Tubing (7/8 O.D. X 5/8 I.D. X 10′)- $18.84
- 2 x #006 SS CLAMP 3/8″X7/8″ DIA – $1.88
- 1-1/4″ Flex Coupling for CI, PL, CU, LEAD- $5.98
- 1-1/4″X3/4″ PVC Bushing – $1.38
Appliances:
- Fan-Tastic Vent 4000R with Reverse Switch- $159.99
- Koolatron 1.7 cu. ft. AC/DC Refrigerator- $153.59
- Americana by Elite Cuisine 3-in-1 mini breakfast center – $27.37
Table:
- Table Leg-Russell by Edelbrock MA-951 Chrome 29-1/2″ – $17.34
- Table Base- Russell by Edelbrock MA-1119 Chrome Exposed Round – $9.41
Bed:
Interior Design:
- Tension Rods:Camco 43833 Oak-Finish Cupboard – $4.42
- Upholstery Fabric (Waverly Inspirations- Color: Tile Adobe- 4@$3.97/yard)- $15.88
- Eclipse Blackout Curtain Panels– $13
- Tension Shower Curtain Rod– $10
Total Cost of Building Materials, Interior Design & Appliances: $974.52
Solar Electrical System:
- Goal Zero Yeti 1400 Lithium Portable Power Station- $1800
- 2- 160 Watt Solar Panels (320 Watt)- $350
- Solar Panel Z-Bracket Mount Kit– $16.29
- Misc. Wires and Adapters- $20
Total Cost of Solar Electric System: $2,186
Labor Cost:
- Fan install and electrical wiring (@ RV Renovators)- $220
- Solar Panel Installation- $100
Total Labor Cost: $320
Total Cost of Van Build: $3,480
If you found this post helpful and want to save it for later, please pin one of the photos below:


Awesome guide! I love how you mention the mistakes you made, it’s helpful for a newbie like myself. The process seems so daunting to start!
brilliant build = and beautifully planned out. thanks for all the details. I love it!
I am impressed with your build. I am hoping to start a build on a Transit in 18 months. Did I miss what you are using for heat? Thanks for sharing.
I have tried a few heaters that don’t work great on the solar battery, so haven’t found a good heat source yet. On very cold nights I sleep in my down sleeping bag.
There is a kid who travels the country in a converted Honda Element. He has solved the heating problem. Here is his website.
http://www.elementvanlife.com/
What I want to know is how do you stay cool? Have you considered installing a small ac unit?
If you are ever interested in upgrading to a shower, I can share with you how I have been using a propane, portable, tankless water heater since 2013 in my minivan. For many of us, the only difference between van living and a residence is instant on-board hot water and showers.
Hi Jack, I’m just seeing this now, I’m thinking about including a hot water heater in my remodel, any tips?
Excellent write-up; the links to products is very useful. In parting, the spelling for ‘foe’ is actually ‘faux’ – https://en.wikipedia.org/wiki/Faux .
Lovely build, Anna. I want to model my van build after what you have done. Thank you so much for sharing all the great details.
I love the idea of turning a cargo van into a camper. My dad loves camping, but he doesn’t have enough money for a camper. However, there are some great cargo vans for sale in my area, so this might work for us. I especially loved how you glued wood vinyl to make the floor look great. Thanks for sharing this great article!
Great build. Very economical. Too bad about the expensive Yeti. I just made my own 100 amp – 12 volt power station for about $350. 1400 watt inverter with 2 AC plugs, 4 USB, solar input, 2 lighter plugs all in a battery box. I used a sealed deep cycle lead-acid battery, so we will see how it holds up versus lithium. However, a new lead-acid battery is only $230. Pretty simple to build. Got everything on Amazon.
Thanks for sharing this. It was very interesting and inspiring. Blessings, R
Thanks for sharing this. I have an Astro Van that I will be using some of your ideas on. This is a solid build and one of the absolute best write ups I have seen. You can catch a few of my additions to it on my Instagram. @silver_stacking_steveo
The fitting on the bottom of your sink looks to be cross-threaded
You mention the vehicle getting 18mpg before the build. What is your fuel economy like after the build?
Oddly enough better. I’m getting a little over 19mpg these days. All the materials I used are relatively light weight though, so I don’t think it is affecting my mileage too much.
Great job on the conversion.
Well done Anna. Great to see you did it yourself with a little help from your mum and neighbour and now inspiring others. I’m am a permanent traveller, currently travelling Australia in a 1996 Ford Transit. Fully kitted with solar, fridge, toilet, kitchen and bed for a bit under Australian $3000 including the van!
Safe travels and peace and happiness
I saw that you wrote your biggest mistake was not getting a van you can stand up in…after you’ve had time to adjust, do you still want a hightop?
Hi Kate, The answer is YES (for me), but everyone is different. I actually just recently got a 24″ bubble top installed from a company called Fiberine based out of California. So now I can stand up and have a lot of space to build in cabinets for extra storage. Like I said, everyone is different though, and if you’re outdoors most of the day, then it’s easier to adjust to a lowroof van. My plan is to use the van as my long-term home and stay in one spot for long periods of time while I finish up some projects. With that all in mind, the lowtop was just no longer an option for me as far as comfort is concerned. But now having invested in a high top extension and starting my conversion all over, I wish even more that I had just bought a high top van to begin with.
Can this be insured as an ordinary van or does it need camper and insurance?
Hi John, It is currently insured as a normal van, however I am working on getting it insured as a Class B motorhome after my remodel is complete.
Great team work guys really impressed. You do mention using glue while installing the roof. I would also recommend a coating Rv Roof Magic. This single coating will protect your roof from leakages and work wonders.
Thank you for sharing all of this. I am curious what it cost you to build your second van. Definitely following you as I look for my first van!
Tracey
I was sponsored by my builders for my remodel (I was able to negotiate this based on promoting them to my 30,000+ social media followers and since it was their very first full van conversion and it was my design) so I didn’t pay anywhere near full-price, but the total WOULD have been $32,000 (That cost would have been predominately labor since I supplied most of the materials and all the appliances). Custom builds are expensive period, however, in my own search, the most affordable professional builders I could find were SD Camper Vans at https://sdcampervans.com/ (they have a pre-established layout conversion package beginning at $19,500). The cheapest option is, of course, to build your conversion yourself.
I hope that’s helpful!
-Anna
Hi Anna, the link you provided for SD Camper Vans isn’t working https://sdcampervans.com/ They might have moved or went out of business. Thanks for sharing your build.
Great team work guys really impressed. You do mention using glue while installing the roof. I would recommend a coating of RV Roof Magic. A single coating of RV Roof Magic will protect your roof from leakages and punctures. It’s an ideal roof sealant.
Excellent point of view Here! Thanks for the information. sounds so great and helpful. Kudos!
Well worth a read. Got great insights and information from your blog. Thanks.
Stunning, Thanks for the excellent outline
Good article & an excellent way to articulate. Keep it up. Thanks for sharing.
Beautiful van! You did a wonderful job. I converted my Nv200 into a simple campervan, but not as amazing as yours. I noticed that you had an Iowa State jacket. I’m from Iowa and I spent alot of time in Ames, before traveling to Texas for the winter. Hopefully our paths will cross some day.
Toilet?
Try an Espar (or similar) heater with a small kerosene tank.
A brilliant guide. I think I was a best planned to make. Keep it up. Thanks!
Great article and added tips from others. I would recommend an inexpensive electric throw for heat while sleeping on solar power. They have a automatic shutoff after 2-3 hours and with a push of a button will keep you warm during a cold night.
Very impressive Anna, great ideas!
Hi,
Would you be willing to share the dimensions and details of the bed/storage boxes? I’m basically trying to copy your exact build (your original build), and it’s a little tough to see exactly what you did. If you still have the dimensions and stuff written down somewhere, please let me know 🙂
Hi Connor, Unfortunately, I don’t have the dimensions anymore. That first build was really spontaneous, not a ton of planning went into it. It was kind of just based on how much reclaimed wood I had on hand at that moment, and I just sort of laid down to determine how big the bed would be and built the storage boxes based on what I needed to put in them (pretty much on the spot).
RV Renovations in Mesa wanted $ 800 to install the $35.00 fantastic fan and $80.00 and LED lights.
RV. Renovations in Mesa wanted $ 800 to install the $35.00 fantastic fan and $80.00 and LED lights.
Bought ‘your’ mattress and due for new one again so I returned to the site. Sad to hear you sold off Casper. Hope your travels were all good and a part II follow up. -Doug